Carrying on from Part 1 of setting up Emby with a secure encrypted connection. This post will demonstrate how to get and setup a custom domain name.
Part.2 - Getting a Domain Name.
Getting a personal domain name not only looks better but makes getting a SSL cert much easier. There are plenty of registrars out there, goDaddy, crazydomains, 123.reg, namecheap etc.
For the purpose of this write up i will use namecheap.
Create an account with namecheap.com and login.
Click Domains at the top and registration.
Now type in the search box what you want your personal domain to be called. i.e. embyssltest.com
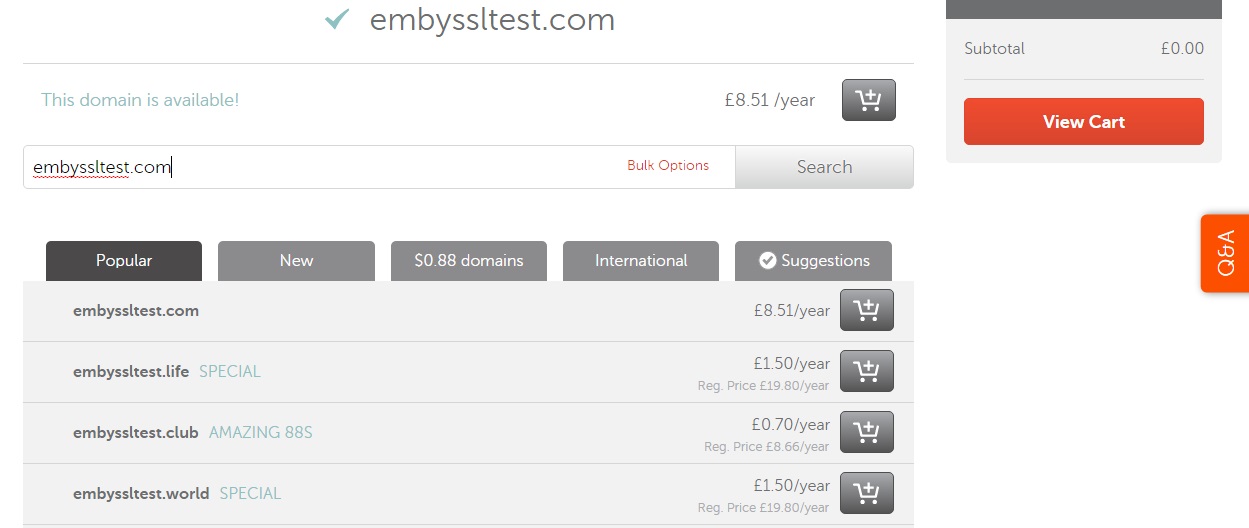
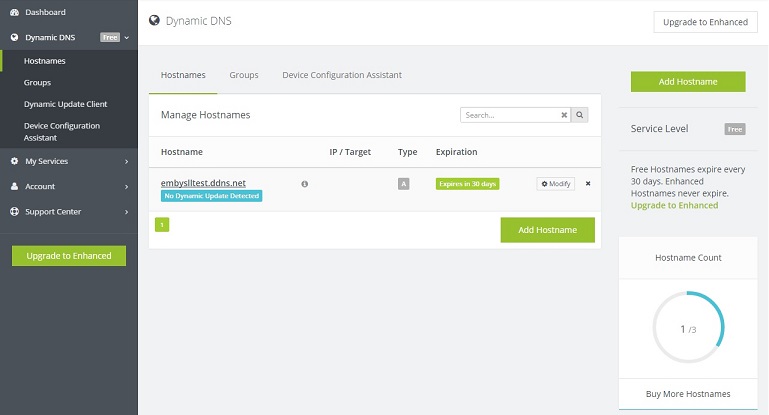
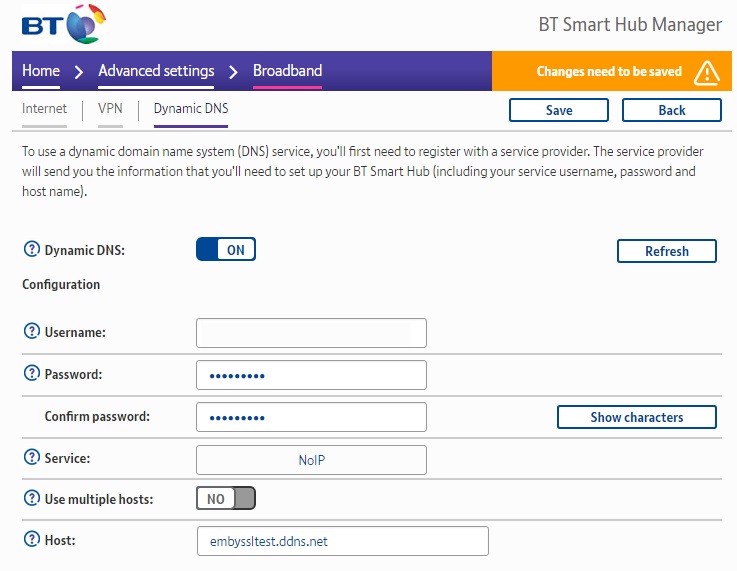
once you have decided on your name and bought it you need to set it up so that your new domain name knows where your emby server is. We do that by setting up a record to tell embyssltest.com to point to embyssltest.ddns.net that we set up earlier.
On namecheap head to Advanced DNS
Under host records - click add new record
Select CNAME.
host = emby
value = embyssltest.ddns.net (change it to your DDNS)
TTL = Automatic
now we should have emby.embyssltest.com which forwards to embyssltest.ddns.net
Optional (using a Custom domain name to do the Dynamic DNS'ing)
Head over to namecheap.com
Create an account or login to your existing account.
Go to Advanced DNS
Scroll to the bottom where is says Dynamic DNS and turn it on.
Create a A+ Dynamic DNS record.
Host = a subdomain for example DNS
Value = 127.0.0.1 (this doesnt really matter as it will be dynamically updated)
TTL = Automatic
should look list dns.embyssltest.com
We also need to create (or edit the CNAME if you created it above for emby.)
Under the Host Records
Add new host record.
Host = emby
Value = DNS.embyssltest.com
TTL = automatic
We now need to find a way to update the NameCheap DDNS. Some routers will support this (follow Part.1 but substitute no-ip for the namecheap details) however if your router is like mine and doesnt support namecheap ddns then you need to download software to do this. Namecheap offer their own client.
Unzip it and enter your details for namecheap.
Once running it will update the 127.0.0.1 entry above with your external IP.
Hope your still with me. only a few more things to setup!
Tuesday, 14 February 2017
Emby - SSL Setup (PART1)
I have recently setup a secure, encrypted connection to my Emby Server. This 5 Part post will explain how I did it, demonstrate 2 ways in which it can be done using a direct connection on port 443 and using a nginx reverse proxy.
Before I begin there are 2 options here. I recommend option 2 or Part.1.A below. But it requires you to purchase a Domain Name. Option 1 is free.
Part.1 - Dynamic DNS
There are many services that offer a Dynamic DNS service and most are free. If you have a static IP from your ISP then you can skip this part but if you're like me then my ISP IP address changes every time my router restarts.
I use Namecheap for a DDNS but you can also use noip, dynDNS. For the purpose of this thread I will demonstrate using No-ip.
Goto noip.com and create an account.
Click on Dynamic DNS (Free) on the left hand side.
Click create a hostname.
Hostname = what ever you want your hostname to be called
Domain = what the part after your hostname will be.
i.e embySSLtest.ddns.net
Now you need to configure how the DDNS address will get your ISP IP address. There is software available which will run constantly on your PC and check for IP updates or some routers support a DDNS services.
On my BT router under Advanced settings > Broadband > Dynamic DNS I can enter the account details we have just setup.
Once that has been done we then need to Port Forward Emby's ports on our router. For this write up we will need to forward port 443 to the Internal IP address of your Emby Server. for example 192.168.1.100
To test your DDNS you can also temporarily forward port 8096 to your emby server. Then all you have to type in the Web address bar is http://embyssltest.ddns.net:8096 and it should take you to the web app
Part 1.A. Dynamic DNS With Custom Domain Name.
Ok, so this is an extension of Part 1. Dynamic DNS. If you used Part.1 above then got a SSL Cert for your shiny new domain name and followed all the other steps. When browsing to https://emby.embyssltest.com you will connect via HTTPS however your browser will warn you that the Cert isnt trusted as it was assigned to embyssltest.com however you are browsing to embyssltest.ddns.net because of the CNAME and URL redirecting.
To fix this we need to setup your new domain name to do the Dynamic DNS'ing. Head to PART2 to find out how!
Labels:
443,
blogger,
cinema,
computer,
custom,
DIY,
dynamic dns,
emby,
https,
media browser,
nginx,
plex,
port443,
reverse proxy,
ssl
Saturday, 12 November 2016
More Youtube Video's, Xbox Streaming and COD!
Uploaded a few new videos to Youtube. The first video explains my xbox streaming setup. It also demonstrates that you can stream your xbox + record it using very little additional equipment thus keeping the cost to a minimum and making it easy to do. I have also over come an known issue with xbox streaming and that is being able to include your party chat in the stream as well as your own mic (live commentary). There are various otherways shown on youtube to overcome this limitation however they often require additional equipment whether it be splitter cables or mixing amps. Without giving too much away, please check out the video.
My second video it some gameplay footage of Call of Duty Modern Warfare Remastered on the Xbox One. It's me playing through Campaign on Veteran Difficulty. This particular video shows The Bog mission defending/rescuing the tank. Enjoy!
Sunday, 23 October 2016
Youtube Adventure
I started by uploading some game footage mainly recorded on the Xbox One. Hopefully in time I will get a chance to upload more footage maybe some vlogs and other type of video's. But for now main my content is gaming and specifically has been the Division although I will be moving onto COD IW or more likely COD 4 Remastered (one of my all time favorite games) when they are released in a few weeks time.
I'm not really sure why I decided to upload video's to youtube, but like many other millions of people I wanted to give it a try to see what it's all about. After creating an account, setting up my channel I turned to editing software. Having used Cyberlinks Power Director previously I jumped straight in. Before long I was researching voice over Mics game capture hardware and everything else that goes with it, however i decided to stick to screen recording using Xbox Home Streaming to a Windows 10 PC and found that my headset Mic is adequate enough for the time being. When or more likely if my channel ever does get going maybe then I will look at upgrading my Mic to a Blue Snowball or AT2020 and getting an Elgato or possibly an avermedia device to make it easier.
Wednesday, 10 February 2016
ROG Red - PC Build
I've always been a PC gamer at heart and thought I would write a quick post on my PC setup. It's a modest setup built by myself. My previous setup was a few years old, thrown together with out much thought and started to struggle on the new releases. It was also loud and kicked out more heat than a multi fuel stove.
Parts list
Intel 4670k CPU overclocked to 4.0ghz
Asus ROG Gene VIII Motherboard
Asus Strix Nvidia 970 GTX
8GB Corsair RAM
H100i Water Cooler
Colour Coded Corsair SP120 Fans
Fractal Design Midi R2 Case
When picking the parts I wanted the best bang for buck without braking the bank. It also had to be a lot quieter than my previous PC and run cooler. Water-cooling the CPU made a big difference as did the GTX 970 which runs silent at idle due to the fans not needing to spin.
With this build I took a bit of extra time in designing what the inside would look like, sticking to a colour theme and braiding cables.
Subscribe to:
Comments (Atom)


